
 I have been asked to do a how-to on this kimono top by Burdastyle members, and I finally got to it. I am not very good at explaining things, but I will try. This top is very easy to make, and once you get used to it, it takes less than an hour to make this.
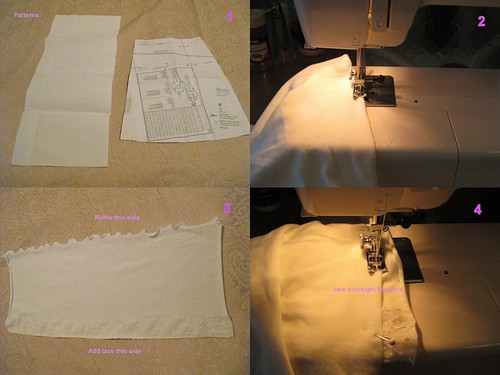 1. There are two patterns you need. One is a back bodice pattern from Tara pattern from Burdastyle, and the other is rectangles. For size small, I use 10"×25" rectangles. You would need two bodice, and two rectangles. Cut out the fabric. You need about one yard of stretch knit fabric.
2. Sew bodice. Put bodice together, and sew side seems. I like to finish up with french seams, but if you want to serge, that would be find too.
Hem the bottom as well.
3. Sew the rectangles. On one side, add lace if you'd like. For the other side, I usually ruffle the edge to add feminine feel of it. You can make many different variation of this!
4. Connect the rectangles to the bodice.
Take the 10" long side of the rectangles, and sew it to the upper hem part of the bodice. Make sure to leave about an inch and a half as an allowance, so you can use the allowance to make a loop for an elastic to go through. Make sure that the right side of the fabrics are facing each other. Sew both front and back of the clothes.
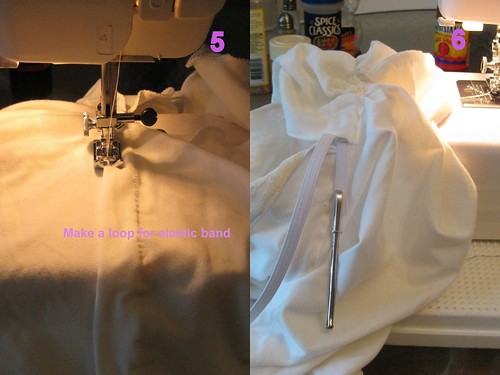 5. Make a loop for the elastic band. Using the allowance of the rectangles, make a loop and sew it all around the shirt.
6. Cut the elastic band in the length of your under bust. Using bodkin, put the elastic band into the loop. and you're done!
I hope I explain this well.. Let me know if you have any questions! I would love to see how your kimono top turns out:)


8 comments:
thanks for sharing!
the dress above is very pretty :)
no problem! i want to do more tutorials in this blog in the future..:)
thanks thanks for sharing!
your welcome!
Oooo thank you for sharing! Can't wait to try make one myself...
enjoy suki!
It was very wel explained but since I'm a swede I've never heard of the word "serge" before... is it kind of the same as ziczac? An french seams? And also... how do you ruffle the arms here? I'm talking about the http://vivatveritas.blogspot.com/2009/06/diy-kimono-top.html - post =)
Thanks!
caroline:
do you have a serger? serger is a type of sewing machine you use to finish up the edge of the fabric. to serge means to overlock the edge, but if you dont have a serger, you can use zigzag stitches on your sewing machine!
ruffle, you can use serger, or if you dont have one, you can use zigzag stitch, and make the stitches narrow, and sew the edge of the fabric while you are pulling the fabric.. i hope this makes sense!
Post a Comment